When I set out to build my new reef I knew I wanted to replicate the look I had in my former 225 gallon tank. It had two islands and was off the back wall a few inches so there was plenty of room for water to circulate in and around the reef. It was also aesthetically pleasing so I knew I had a proven formula that would work for my new 187 gallon tank.

Aquascape of My Former 225g Tank
At 60 inches the new tank is a foot shorter lengthwise than the old tank but the width (30″) and height (24″) are the same. The trick would be to replicate the channel between the islands with less room lengthwise.
In a prior blog post I went into detail on the pluses and minuses of using dry rock versus live rock and my ultimate verdict was to give dry rock a go with the new tank. I have never used it but I was intrigued about having the time to sculpt a stable, functional and eye catching structure without having to deal with the mess when handling wet live rock. I also had some bad experiences with problematic algae “emerging” from live rock so I wanted to minimize that possibility by using dry rock.
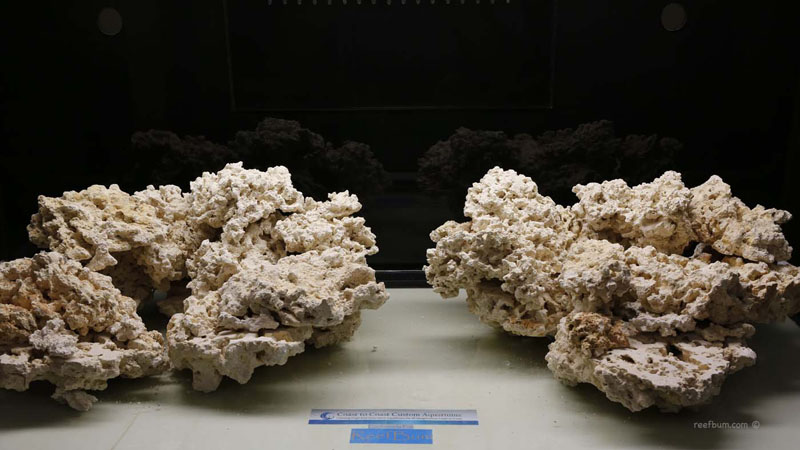
I ended up ordering 130 lbs of Key Largo Dry Rock from Marco Rocks. 80 lbs of the rock was their “prime cut” rock, which is cut flat on one side. Step one was to play around a bit with the different pieces of rock and build a mock structure outside of the tank. My goal was to build it, tear it down and then build it back up piece by piece inside of the tank. When I was done building my mock structure I placed numbered toothpicks on each rock and took photos that would serve as blueprints to rebuild the rock inside of the tank.
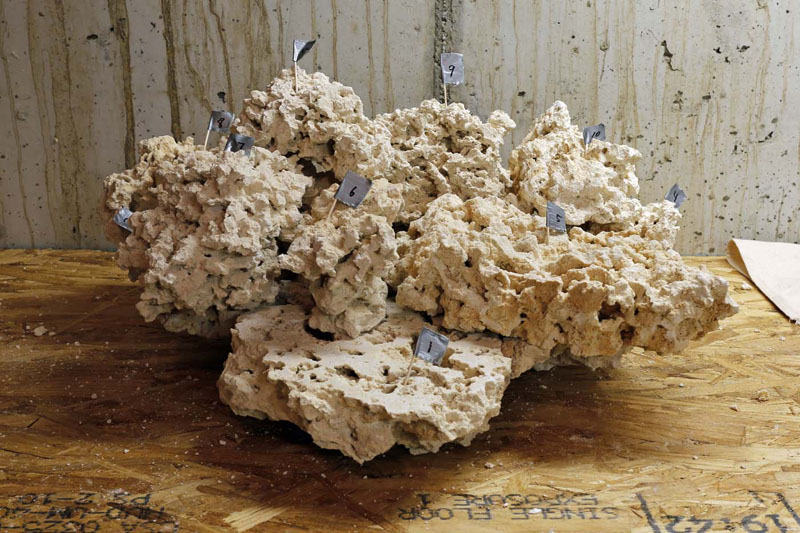
Mockup of Island on Right For New 187g Tank – With Numbered Toothpicks
Here is a time-lapse video that captures how I aquascaped the tank.
As for the specifics of the structure, I ended up using some of the flat prime cut rock as my base and had the rough edges touching the bottom. This was beneficial in three ways:
- The rough side had protruding rock that elevated the base and created gaps between the rock and the bottom, creating spaces for water circulation and minimizing the chances for detritus build-up.
- The flat side on the top has some nice shelves to place frags and corals
- The flat side on the top provided a stable platform to place the next level of rocks.
To stabilize the structure I used some mortar purchased from Marco Rocks. It really cemented things together and I was also able to use it underwater to fine tune the aquascape once water was added. Overall, aquascaping with Marco Rocks dry rock was relatively easy and I would certainly recommend it to anyone who wants to try something that is versatile, functional and aesthetically pleasing. For more on aquascaping, please read Aquascaping – Less is More for Reef Tanks.
Additional Resources
If you would like some help with a new tank build, including help designing a custom aquarium, or help re-configuring your current setup then you can visit this page for more information. And if you are looking to add some equipment, I do sell GHL, Pax Bellum, Reef Octopus Calcium and Kalk Reactors and Royal Exclusiv products, including Dreamboxes, which is the equipment I use and recommend. I also sell Reef Brite metal halide and LED fixtures as well as Maxspect & IceCap Gyres.
As for additional insights and information, please explore my many other reef tank and SPS related articles as well as my YouTube channel. For an even deeper dive into reef tank care you can check out my Reef Keeping Master Class. This online course is an immersive and one of a kind educational tool designed to help reef aquarium hobbyists build and maintain a beautiful SPS reef tank. The course is a series of video presentations with some supplemental video from my YouTube channel. There are also quizzes to help students retain and understand the information presented in the course.
Need some frags…..I can help with that as well 

